
Knitting Pattern

|
| Price: | FREE | ||
| Sizes: | Child, Small, Medium and Large | ||
| Needle size: | US#6 - 4 mm | ||
| Yarn Weight: | DK / 8 ply (11 wpi) | ||
| Yardage: | 185 - 213 yards (169 - 195 m) | ||
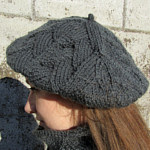
Vintage looking, low-weight beret which is easy in wear. Don’t mess up your hair, wear a beret instead of a beanie!
The head band can be stretched to fit head size. This pattern comes in four sizes:
- Child: ± 54 cm
- Small: ± 56 cm
- Medium: ± 58 cm
- Large: ± 60 cm
|
|
|
| All pattern downloads and purchases are handled through ravelry.com. Click here for more information. |
| You might also like: |

|
 |
 |
Simply beautiful.
ReplyDeleteThank you for your
pattern.
I just found your blog, and I have to say that I can't belive your patterns are FREE! I'm happy that they are, but I think you're very talented and should probably consider selling at least some of your designs (Ravelry or some such thing), or try getting them published somewhere. Thanks for the lovely pattern!
ReplyDeletewow that beret is stunning !!! Thanks for sharing. I just found you via dailyknitter.com
ReplyDeletecan you explain what you mean by double every non-cable stitch?
ReplyDeleteHi anonymous :). With double every non-cable stitch I mean to do an increase on every stitch that isn't part of the cable pattern. This means every stitch in the P1,K1,P1,K1,P1 parts is increased, but not the stitches of the K4 parts. This is done because if there are increases in the cable pattern of the beret, the cable will lose its shape. Thanks for looking at my pattern :)! Happy Knitting.
ReplyDeleteWhat weight number is the yarn used for this pattern? Is it light worsted, worsted, DK?
ReplyDeleteHi. I looked it up and it's DK weigth. (I looked up the definition of DK weigth and it's about the same as this yarn). Hope this helps. Happy Knitting!
ReplyDeleteCould this be adjusted for a 2 yr old as it is so gorgeous!
ReplyDeleteHi! About adjusting the pattern. I think it isn't that hard to adjust the pattern, but my problem is that I don't have a clue what size a 2 year old has, since I don't have kids of my own (yet ;)) Maybe someone can help me out here? I'll try to look into it!
ReplyDeleteI will measure around my daughters forehead and come back to you! Would be so excited if I could make this for her!!!!!
ReplyDeleteHi again her head circumference is approx 50cm.
ReplyDeleteHi! Thanks! I'll try to addapt the pattern. I just have to make sure that the cable pattern is still symmetrical. When it's done, I'll post it with a link to this post.
ReplyDeleteI adapted the pattern, and I think it's ok, but I'm not sure, since I haven't knitted it myself. So if you could give me some feedback on it, that would be great.
ReplyDeleteThank you so much for amending your pattern! I will get knitting and let you know how it goes.I am a bit rusty but your lovely clothes have inspired me. And after 2 boys it is great to have a go at knitting for my little girl!
ReplyDeleteWhat method did you use to double stitches please.
ReplyDeleteFollowing my previous question - as I have not increased before on a row that is both K and P how do I increase - do I follow the basic round (1) and increase on a P1 K2 P1 K4 basis.
ReplyDeleteHi! I doubled stitches by p1 f&b (Purl a stitch in the front and in the back (=increase of 1 stitch)). I'm trying to use the right abreviations now for my new patterns. You can find those here... http://lovelyknitting.blogspot.com/2010/05/abbreviations.html
ReplyDeleteHi again! I didn't completely understand the question, but I'll try to anwers ;). To increase stitches in the first row (and any other row in this project), you just follow the stitches of the previous row. If the stitch underneath is a knti one, you just knit one in top. If the stitch underneath is a purl, you'll have to increase a stitches by purling the same stitch twice. Hope this answers your question!
ReplyDeleteThank you!!
ReplyDeleteDo you join the stitches with the round needle or just knit back and forth and then join the seam?
ReplyDeleteHELP!
Hi! The beret is knit on a round needle, so there is no seam. At the end of a round in the pattern, just start the next.
ReplyDeleteHow much K1P1 ribbing did you do? It was at the very start of the pattern correct?
ReplyDeleteHi! I did 15 rounds of K1, P1, as stated. I don't exactly understand your second question, but I'll try to answer it anyway. I casted on 72 stitches and in the first round I had an combined number of stitches which is also 72 stitches, like this:
ReplyDeleteP1,K1,P1,K1,P1,K4 (=9 stitches) & repeat 7 times (=9 stitches x 7). Thus that is an combined number of 9+9x63=72 stitches.
I hope that helps!
Hello. I am a beginner knitter, i saw your pattern and loved it, so i want to give it a try. But i am having some problems with the circular needle. My question is what size did you use? In diameter, i mean. 40 cm perhaps? Also some other information on the needle type would be useful, anything you can spare. The world of knitting is looking very complicated from where i am standing right now, but i really want to learn. It is a very fun activity. :)
ReplyDeleteHi Raluca! I'm happy you like the pattern. This beret is knit in the round, thus you would have to use a short circular needle (40cm long) OR double pointed (sock) needles. Both should be 4mm in diameter. The circular needles a lighter and easier in use (stitches won't fall off), but when you have very little stitches (16 for example), the flexible part of the circular needle will be too long. Therefore, I always knit it largest part of the beret on a circular needle and just the last rows (with the least amount of stitches) on sock knitting needles.
ReplyDeleteFor this beret you will also need a cable needle. I always use a curved one, because the stitches stay on better. Good luck with your knitting project!
Thank you very much for your answer and for all the information. :) And also, for the pattern. Good luck with your knitting projects too.
ReplyDeleteHello. Many thanks for your pattern. However, I have found that 72 stiches is just a bit too tight for an adult and have decided to give this to my 5 yr. old grandchild. I used DK wool and my tensions were fine.
ReplyDeleteHi Caroline! I've worn the hat the whole winter, but maybe I just have a small hat. I'm making a large version now for someone else, and when the pattern is test-knitted by me, I'll make it available for download as well.
ReplyDeleteI would really appreciate that as my daughter really likes the beret you designed. I look forward to downloading the finished pattern. Many thanks.
ReplyDeleteWell I started in on this hat and it was obvious it wouldn't fit an adult human. Then I did the math. 72/5 = 14 inches, my head 22.
ReplyDeleteHi Rainbows in wool. This (outdated) version of the pattern is indeed quite small. It's not as small as you mention though, since the gauge you used to calculate it was for unstretched rib stitch. The rib stitch part is meant to be smaller than your head size, since it has to stetch and fit around your head. But to come to a point that can actually help you out... The updated versions of this pattern are downloadable through ravelry for free and there are also different sizes available now.
ReplyDeleteHi,i'm Carol try doing LARGE side of this pattern.
ReplyDelete1.ROUND 1-P1.......,P0(Small P1 ; Medium P2 ; LARGE P1,K1,P1)inside i write is correct ?
2.ROUND 16-P5f&b,K4,P4(P7)f&b, K4 , the end of f&b is for P4 or (P7)???
Hi Carol! I'm sorry to answer this so late, but I was moving...
ReplyDeleteFor size large:
1. Round1: *P1, K1, P1, K1, P1, K4, P1, K1, P1, K1, P1), K1, P1, K4*, repeat *_* 3 times
(So if I understand, I think it right the way you wrote before)
2. Round16: *P5 f&b2, K4, P7 f&b, K4*, repeat *_* 3 times (128 stitches)
I hope that it's clear?
how do i get this pattern
ReplyDeleteHi! You can download the pattern by clicking on the download link below the text in the post. It's the globe with the arrow.
ReplyDeleteHello. Romy. Thank you for your wonderful pattern!!
ReplyDeleteI am so excited to make it.
I knitted it till Round 15. I am wondering how I can make 120(I am doing medium size) stitches from 76 stich at Round 16.
f&b doesn't seem to increase the stitches that much.
Thank you. :-)
Hi! I'm happy you like my pattern. You can increase upto 120 stitches by doubling stitch, by knitting them to the front loop ánd through the back loop, which is an increase of 1 stitch per stitch. For row 16:
ReplyDeleteP5 f&b2 (=10 sts), K4, P6 f&b (=12 sts), K4*, repeat *_* 3 times
10+4+12 sts * 4 repeats in total = 120 sts.
I hope this helps! Otherwise, just let me know.
Now I understand how to do it!
ReplyDeleteThank you very much, Romy! :-)
Hi! I love this hat! I'm in the midst of knitting it now, but I have one question. In regards to looks, are the decreases 'knit 2 together', or 'purl 2 together'? Thanks!
ReplyDeleteThis comment has been removed by a blog administrator.
ReplyDeleteHi! Thanks. Now I'm looking at the photos, I think I purled 2 together. Does the pattern state k2tog? I'll check and update if it is wrong.
ReplyDeleteIt did say K2tog, but I went on assuming that is was P2tog and it turned out perfect. Thanks for the gorgeous pattern! :)
ReplyDeleteA little confused. I know K2 means knit 2 and P2 means pearl 2, but what does P0 mean? (Round1: P1,K1,P1,K1,P1,K4,P1,K1,P0)
ReplyDeleteSorry, I throught I changed that. It was an attempt to be very clear, but actually everyone finds it very confusing... P0 means purl 0 (so do nothing). I added it because in the larger sizes, you do need to purl one or more stitches. So if you want to knit the child size, you can just read the pattern as if the P0 isn't there. Happy knitting!
ReplyDeleteHi. I love the pattern but I can not figure out what you mean by CF1 4. Is it the same as just CF4? I can't find the F1 abbreviation anywhere.
ReplyDeleteHi Lauren, I went through the pattern and I think you mean CF1 4 in round 5? With the 1 in superscript? That is just for the foot note describing the abbreviation of CF, so you can ignore it and read it as CF4. I hope that helps you out. Happy Knitting!
DeleteAre you sure you are using dk yarn and 4mm needles? My gauge is slighty bigger at 2 1/2 st per cm, my childs hat of 68 st is measuring 34cm? This means the large hat st count you provide will not even fit my 54 1/2 cm head.
ReplyDelete